This is the first installment into a series of craft ideas which can be created from a pen blank. The Needle ‘n Thread case is made with a hollow spool section to contain a selection of sewing needles. In rifling through my wife’s sewing box, the longest needle I found was 1-7/8″ and is easily contained inside the 2″ long center bore. Each of the spools (at least with the thread lifted, again from the wife’s sewing box) holds approximately 25 feet of thread.
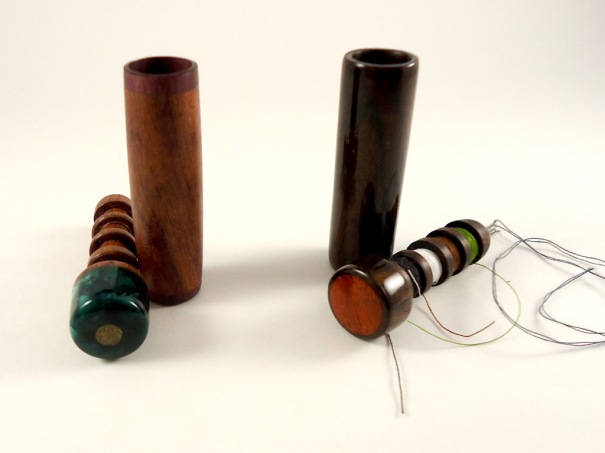
Each end of the assembled piece has about 1/4″ deep wood (as viewed from ends) that can be relieved to inlay your choice of materials. So far I’ve played with wood and acrylic embelishments. A cool looking button cast into resin (or not) mounted into the end might be nice. For the ultimate in EDC stitchery preparedness, a full blank could be used for each piece, making a double length case. The only downside I could imagine aside from finger cramps produced by wrapping so many colors of thread, is that some blanks I’ve received warp. One way to overcome this might be drilling the center section to 7mm and lining it with an oversized brass pen tube. In this case, don’t cut the spools quite as deep, there is only about .007″ between 7mm and the 11/32″ wrench mentioned to size these cuts.
In order to make this project, you’ll need the following items:
- 2 pen blanks — One to create two jigs and the other for the project itself.
- Chuck capable of holding a 3/4″ square pen blank
- Jacobs chuck to fit into your tailstock. It may be possible to drill on a drill press, however the wall thickness is quite minimal around each hole. The holes would have to be drilled with extreme accuracy.
- 7/32″ and 9/16″ drill bits (For the 9/16″, a forstner bit is superior. A twist drill can be used, but this size hole should be made with progressively larger bits to keep from shattering the wood)
- Helpful but not required, 9/16″ and 11/32″ open-end wrenches. (The 11/32″ wrenches are commonly found in an ignition wrench set). Calipers will also work.
You can download a copy of the plans right here and follow along. This also contains a copy of this text so you can print it out and use it offline.

Project notes and dimensional drawing
Prepration
- Start by taking the first blank and mount one end into the chuck. Using a parting tool, slice near the mounted end so the piece retained in the chuck is about 1″ in total length. Then take your 9/16″ drill and bore a hole completely through this piece. This completes the first jig, which will be used to size the friction fit portion of the inside tenon. Remove it from the chuck.
- Mount the remaining portion of this first blank into the chuck using the live center on the tailstock to align the center. With a pencil or other marking device, make a mark on the chuck end to denote which flat is in contact with the #1 jaw so it can be mounted the same later on. Now turn down a 9/16″ tenon approximately 2-1/2″ in length. Using the first jig to check the size of the tenon, make sure the jig will slide easly along the full length, but not be floppy. A strip or two of masking tape when used on the project will provide enough hold to finish turning and finishing operations.
Let’s Go!
- Measure and mark a line 2-1/2″ from the end of the project blank which is going into the chuck. This will be your parting line.
- Mark center on the other end of the blank and using the live center, mount the blank securely into the chuck, give it a spin with the live center contacting and make sure it’s running true.
- Using the Jacob’s Chuck, drill a 7/32″ hole, 2 inches deep into the tailstock end, then replace your live center and support the blank with it again.
- Turn a 1-3/4″ tenon down to 9/16″ diameter using the 9/16″ open-end wrench (or calipers) to size. Check using jig #1 again to make sure the jig will slide easily over the entire tenon.
- Turn the next 1/8″ of tenon down to just proud of the 9/16″ tenon, and using the #1 jig again, trim it down until the jig slides over with just finger-snug pressure. This is the most critical operation! You want this to be tight enough not to come apart inside a pocket or purse, but loose enough you don’t have to exert so much force that the needles fly out once you manage to open it.
- Mark locations for the thread depressions and pare them down with a parting tool, using the 11/32″ open end wrench as a sizing guage.
- Use a parting tool and cut to just below the flat surface of the blank on the tailstock side of the line placed in step 1.
- Turn as much of the blank into round as you are comfortable accessing up to the chuck.
- Sand and finish this first section. You can always wrap it with a strip of masking tape and use jig #1 again as a jam chuck to further embellish/finish the top of the cap, but you’ll never get the thread holding portion perfectly centered again without additional rigging.
- Part the remainder of the parting line, keeping to the tailstock side of the cut.
- Drill a 9/16″ hole, 2-1/4″ deep into the remaining portion of the blank.
- Mount jig #2 back into the chuck using the tailstock to center it as close as possible.
- Using masking tape as needed, mount the outer part of the case onto jig #2, again being snug, but not extremely tight. Bring the tailstock up for light support.
- Finish rounding the blank with light cuts, bring into final shape, sand & finish.
Grandpa, Data Junkie, Woodturner, Electronic Dabbler


Leave a comment